
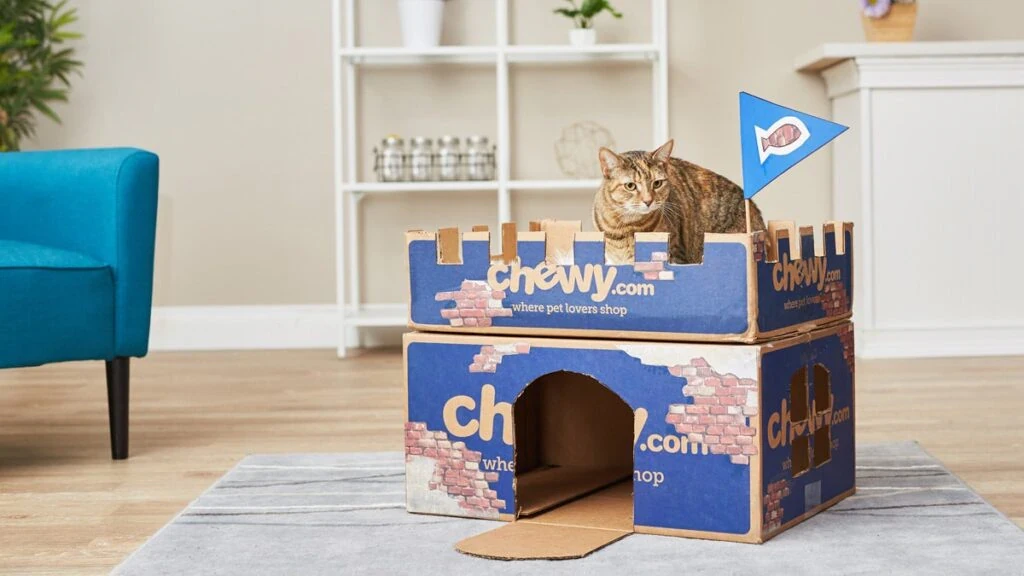
PawVerde.com – Building a DIY cardboard cat castle involves reinforcing a cardboard base, cutting symmetrical windows and doors, and constructing a peaked roof with internal braces to ensure structural integrity. By using non-toxic adhesives and scoring techniques, you can create a multi-level sanctuary that is both safe and aesthetically pleasing for your pet.
“Cats love lounging around in boxes, especially cute house-shaped ones!” notes Happiness is Homemade.
The Architectural Blueprint: Designing a Multi-Level Castle
For an advanced build, move beyond a single box by using a modular design. Create a central multi-room tower using progressively smaller boxes, connect rooms with cardboard bridges, and use crenellated edges for a true castle aesthetic. Ensure all attachment points are reinforced with double-walled cardboard for stability.
Modular Expansion vs. Single Box
While a single box provides immediate shelter, a modular approach allows for verticality. Instructables practitioners suggest that building a tower of interconnected rooms offers more engagement for active cats. A common failure mode in modular builds is the “wobble effect,” where the center of gravity shifts too high, causing the structure to tip. To prevent this, ensure the largest, heaviest box serves as the base. A single box might take only 5 minutes to assemble, but a multi-level fortress requires careful planning of weight distribution.
Designing for Catification
True catification requires thinking like a feline. Instead of just one large room, aim for 2 or 3 distinct zones. The Green Mad House emphasizes that cats value both high vantage points and enclosed hiding spots. When planning your blueprint, consider these structural elements:
- Vertical towers for climbing.
- Horizontal bridges to connect separate modules.
- Small “lookout” windows for surveillance.
- Enclosed sleeping chambers at the base level.
Essential Tools and Cat-Safe Materials
Selecting the correct materials is vital for pet safety. Using the wrong adhesive or paint can turn a fun project into a health hazard. The following table compares common bonding agents to help you decide which to use for your specific castle build.
| Adhesive/Tape Type | Hold Duration | Painting Impact | Best Use Case |
|---|---|---|---|
| Hot glue | Instant hold | Minimal | Quick structural joins |
| Gorilla glue | Long lasting | Moderate | Heavy-duty load points |
| Packing tape | Temporary | High damage | Internal box sealing only |
| Painter’s tape | Temporary | Low impact | Marking cut lines |
The choice of tape is critical for the final aesthetic. The Green Mad House notes that using packing tape can damage the cardboard surface during removal, making it much harder to achieve a smooth paint finish later on. Practitioners recommend using painter’s tape for temporary holds to preserve the integrity of the cardboard fibers.
The Non-Toxic Adhesive Audit
Safety is the priority. PDSA advises that it is wise to remove any small loose items that your cat could swallow or choke on, such as staples or tape. When choosing glues, ensure they are fully cured and odorless before allowing your pet near the structure. A single misplaced staple can become a dangerous ingestion risk.
Choosing the Right Cardboard Thickness
For a stable castle, aim for cardboard with a thickness of at least 0.5 inch. Thinner cardboard tends to buckle under the weight of a climbing cat. If you are building a multi-story tower, doubling the thickness of the walls is a highly effective way to increase the castle’s lifespan.
Step 1: Preparing the Foundation and Walls
A sturdy castle starts with a reinforced base. To ensure the foundation can handle a feline resident, Instructables documentation recommends doubling the walls by folding the flaps on the inside. This creates a much thicker, more rigid perimeter for the bottom-most box.
Double-Wall Reinforcement
To maximize stability, do not rely on a single layer of cardboard for the bottom. Instructables suggests that you can double the walls by folding the flaps on the inside. This creates a much thicker, more rigid perimeter. This technique is essential for the bottom-most box of your castle.
Hiding the Printings
Most shipping boxes come with heavy ink and logos. To create a clean, professional look, turn the box upside down so the printed side faces the floor. This provides a blank, neutral canvas for your decorations. Once the box is positioned, glue the bottom flaps securely to create a solid floor.
Step 2: Precision Cutting and Symmetrical Windows
The castle’s appearance depends on precise cuts. To make add-on pieces easier to shape, The Green Mad House suggests you should cut one piece and then scour the surface to facilitate bending.
Shortcut: Instead of cutting out individual pieces for the add-ons, cut one piece and scour the surface to make it easy to bend.
The Roof Mirroring Technique
Achieving symmetry in roof lines can be difficult. The Green Mad House suggests the “Roof Mirroring” technique: when doing the roof lines, only cut one side out. Then, take the cardboard you cut away, flip it, and trace it on the opposite side for a mirror image. This ensures that both sides of your peaked roof are identical in shape and size.
Scoring for Perfect Bends
To get clean, sharp corners without the cardboard crushing, use the “scouring” method. Lightly run an exacto knife across the surface without cutting all the way through to make it easy to bend. This technique allows you to create crisp edges for towers and window frames, providing a much more professional finish than simply folding the cardboard by hand.
Step 3: Constructing a Load-Bearing Roof
The roof is the most high-stress part of the castle because cats often use it as a lookout platform. A sagging roof is not just an aesthetic failure; it is a structural risk. Happiness is Homemade recommends a specific method for creating a peaked roof that remains rigid.
- Cut two flaps into triangles to serve as the roof peak.
- Glue these triangles to the top of your wall structure.
- Cut a separate, larger sheet of cardboard to act as the roof covering.
- Apply a 2-inch overhang on all sides to provide extra stability and a classic look.
- Secure the roof sheet over the triangle peaks using a strong adhesive.
Adding Internal Braces
To prevent the roof from sinking when cats climb, add internal braces inside the roof structure. Instructables notes that these braces act as pillars, transferring the weight from the roof directly down to the walls rather than letting the cardboard bend under the pressure. This is the most effective way to prevent structural collapse during active play.
The 2-Inch Overhang Rule
When cutting your roof pieces, ensure you include an extra 2 inches of sheet size for a roof overhang. This not only looks more like a real castle but also provides a structural “lip” that helps stabilize the top of the walls. Both The Green Mad House and Happiness is Homemade suggest this extra margin for a better finished product.
Step 4: Safe Decoration and Lighting
Aesthetics must never compromise safety. According to PDSA, you must avoid using oil paint, spray paint, or wall paint, as these materials are dangerous for cats.
The Primer Method
If you want to paint your castle, you need a proper base. The Green Mad House mentions that a white spray paint coat can serve as a primer. However, ensure you use a non-toxic, water-based alternative if you are concerned about fumes. Once the primer is dry, you can apply up to 2 coats of detail paint for a vibrant finish.
Safe LED Integration
To give your castle a “glow,” you can integrate battery-operated LED lights. Avoid any lights that plug into a wall, as wires pose a chewing hazard. Ensure all LED components are tucked away in a compartment that is inaccessible to the cat, preventing them from pulling out small bulbs or batteries.
Troubleshooting: Why Your Castle Failed
Diagnose your build by checking for these three common structural or safety issues:
- Sagging Roof: This occurs if you omit the internal braces recommended by Instructables. If the roof bows, install vertical cardboard pillars inside the top room.
- Wobbly Base: This is often caused by insufficient wall thickness. Ensure you are using cardboard of the appropriate thickness and have used the “double-wall” folding technique.
- Peeling Paint: This usually occurs if you used packing tape that damaged the cardboard surface. For future builds, stick to painter’s tape to keep the surface smooth.
FAQ
Is spray paint safe for cat houses?
No. According to PDSA, do not use spray paint, oil paint, or wall paint as these can be dangerous for cats. If you need a primer, use a non-toxic water-based alternative to ensure your pet’s environment remains safe.
How do I stop the roof from sagging?
To prevent the roof from sinking when cats climb on it, add internal braces inside the roof structure as recommended by Instructables. These braces act as support pillars to distribute weight downward.
Why shouldn’t I use packing tape?
The Green Mad House warns that using packing tape can damage the cardboard surface during removal, making it much harder to achieve a smooth paint finish later on.